If Creditors is integrated with the General Ledger, only transactions
that are NOT put through Creditors will need to be entered into the ledger i.e.
Balance Sheet Items and bank fees etc.
When integrated with other modules, ensure that there is a common cut off
point at the specified End of Year date. See posting payments, Creditors and Debtors,
to the GL.
Transactions are posted to the 12 period balances and
are held for the financial year. There are a further 12 "periods of grace" (13-24) which
allow transactions to be entered after the end of your financial year, but
before the Annual Roll. These become periods 01 - 12 after the Annual
Roll.
There are several financial reports that can be generated from the Ledger.
These can be formatted to produce complex totals and layouts for
individual Charts of Accounts.
The accounts are displayed in a variety of ways.
Select an account and a period / period range between 01 - 24.
N.B. the "Period Opening", "Period Movement" and "Current" balances
displayed are for the selected period(s).
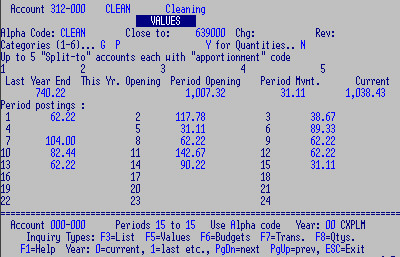
Toggle between
Alpha or
1 Numeric codes.
Year:
00 for current,
01 for last year,
02
for previous rolled year financial etc.
Enter OR
Page Up /
Down to scroll though account records.
F3 for a list and
Enter to select.
F5 for period Balances.
F6 for
Budget Spread if used.
F7 for Transactions.
Transactions that are updated from Creditors and Debtors are named "CRnnnn", or "DTnnnn",
where nnnn is a run number. To print the amounts that make up the totals of the transactions:
Creditors Update: run a
Creditors Invoice Register for the Run No e.g. 5567 to 5567.
Creditors Payments: run a
Creditors Transaction Report for the PL Run No e.g. 6775
to 6775.
Debtors Payments
F8 -
Quantities if used.
Check BANK, GST, CREDITORS and DEBTORS Ledger figures at the end of each
month against the Current Position figure of the Bank
Reconciliation and the Creditors
and Debtors Control Reports. In each case the Opening and
Closing balances of the period and the Movement should match figures on
the reports.
There is no restriction on the number of transactions that can be
entered into a batch but it is easier to find an error in smaller batches than large
ones. It is also less painful to lose a small amount of unprocessed work in
the event of a network or power failure.
F2 or
Enter.
- Reference: optional: useful as an audit trail and
journals may be reprinted by batch reference. Use a
document reference e.g. bank statement page no. or a reference such as "FEE"
etc.
- Posting Period: the financial period this batch
belongs to. Accept the current period default or select any period,
past or future. ALL postings in a batch are posted to the same period.
N.B. At the end of the financial year but BEFORE THE
ANNUAL ROLL DO NOT POST TO PERIOD 01 - this will mix
"this year" and "last year" figures: use periods 13 - 24 which will
become the new 01 - 12 after the Roll.
- Date: enter the date of the transaction or accept today's date.
Transactions are displayed chronologically; use the same dates to keep
entries together if required.
- Reverse: Y to Reverse this batch to a specified
financial period. All transactions in the batch will be posted to that period with the values reversed - no
further action is necessary. Use for e.g. accruals to the next period OR when a journal entry has been sent
to the wrong period, see more below.
N.B. Do NOT reverse out of period 24 into 25 - settings can prevent this.
- Disallow Auto Balancing: Trust Account Ledgers ONLY.
Y to override the Reverse / Balance To setting on a (Trust) account which has this feature and manually enter the balancing entry.
If an error message is displayed (e.g. an Invalid Period) press any key and
correct the error.

- Enter the account code at the prompt. A or N to toggle
between Alpha and Numeric codes. F3 to pluck.
- Value: If no value is entered, the posting is ignored.
- Cheque / Bank Reference: Optional. 7 digit cheque
No.s are accepted - this field is NOT displayed on Lookup.
- Text: for description displayed on Lookup.
- Batch Reference: Optional. Leave blank for Header
reference to default, or enter e.g. cheque No. etc - displayed on
Lookup. This can be set to repeat on the next entry - saves time if doing a list of
cheques where only the last digits need changing.
- Disallow Auto Balancing: as above.
- Split: Y if this Account is to be Split to
another account (e.g. GST). N if you do NOT want to split the value on
this occasion. Is not displayed if the account has no Split to codes.
- Date: change if different from Header. This can be
set to repeat on the next entry - saves time if doing a chronological
list where only the first digits need changing.
F8 to attach any number of extra text lines to a posting.
F9 to end the batch. The Total is displayed on the screen, check
that your postings are for the correct amount, account and period.
Esc
to make any corrections OR
Enter to accept.

At Options prompt:
F6 to correct the batch, (see corrections below).
OR
F9 to Process your Postings. The batch is updated to the Accounts
Master File and cannot now be changed; any mistakes must be corrected
with further postings.
OR
Esc to exit without processing to come back and complete or
delete the
batch later.
During input:
F6 to Fix: There are several options available in this mode.
Arrow or Page Up / Down in the "Hot" Column, change a
value and Enter to confirm
OR F6 again on selected line to change any of the details of the entry.
F3 to pluck a different account code, Enter to change any fields.
OR F7 to Delete the line and F2 to confirm.
OR F5 to insert text or transaction lines. With the cursor on e.g.
line "40", F5 you can insert line "41" to "49".
Each transaction is given a line number (or record sequence) in increments of 10
(numbers on far left hand side e.g. "0020"). Use this number to select any transaction for correction.
F7 to Restart - this deletes the whole batch,
F2 to confirm.
F9 To End.
Enter to accept Total -
F9 to Process.
If the input has a non-zero balance an error message displays, press any
key to find and correct the error before processing.
At any time
Esc to Program Options, from there you may
Enter
to return to input.
Once a batch is processed it cannot be changed. Correcting journals must be
made.
For the wrong period e.g. "Account X" +50.00 and "Account Y" -50.00 in
period 2 instead of 3:
Do a reversing journal to period 2 and Y to
Reverse to period 3:
"Account X" -50.00 and "Account Y" +50.00
Result: zero in period 2 and
"Account X" +50.00 and "Account Y" -50.00 in period 3.
For Debit / Credit errors: e.g. you processed a sale as Debit $50.00 (a
positive value) instead of Credit $50.00 (a negative value), you will
need to enter a positive journal for TWICE the negative value.
"Sales" -100 and "Debtors" +100.00
Result: Sales Credit 50.00 Debtors Debit 50.00
If you entered the wrong value you may only need to process the difference,
e.g. 50.00 instead of 50.50
Repeat the original journal for the 50 cents.
OR if the value was 49.50 and you entered 50.00
Repeat the original journal with the opposite sign for 50 cents.
For an incorrect account: repeat the original journal with the OPPOSITE
values and do it again to the correct accounts.
Stop all processing to General Ledger and Creditors while the roll is run.
Enter Run Option:
Period or
End of Year Roll and
Confirm -
Esc
to abandon.
The Monthly Roll increments the current financial period by one e.g.
from 05 to 06 and updates the end of month date on controls.
Processing may continue in periods 13-24 until you are ready to roll the year.
The Annual / Yearly Roll prepares the Ledger for the following year.
N.B. The Annual Roll MUST be run at the end of each financial year
else transactions for BOTH years will be merged: i.e. the NEW period 1
will be added into the OLD period 1.
Ensure a common cut off point for the End of Year date, especially if
integrated with other modules.
Stop Costing Suppliers Orders and post all costings to Creditors (run
a Costings Register 8SOP03C2 to check). Run
a Creditors Invoice Register of unprocessed Invoices over all 24
periods (good practice every now and then) and update all Invoices - there is a toolkit to
change e.g. period 15 period 03 etc.
Post any payments to General Ledger, both debtors and creditors. This will ensure that no updates will
be posted e.g. period 15 instead of period 3 after the roll.
The last 12 period transactions and balances are written to History Files.
N.B. History files may need re-naming - check with us first.
N.B. History files should be kept in the same directory as current for the Roll to correctly re-name files.
The balance of each account becomes the "Last Year End" and, if not
Closed to another account, "This Yr. Opening" balances.
The balances of any Close to accounts are added to
the account specified in their individual records.
Balances in periods 13 - 24 become this year's periods 01 - 12.
- If not offsetting balances to a Close
to account, ensure all closing Journals from your accountant are posted.
- Print a Chart of Accounts
to check for the company accountant; check Close to and make any
amendments to the records.
- Make any changes to Budget Spreads and Report Format File.
- Print EOY reports: Last Year to Date comparisons, Budget reports etc.
- BACKUP BEFORE THE YEARLY ROLL and hold as EOY Financials.
- STOP all processing to General Ledger and Roll.
- Print a Trial Balance for Opening Period.
N.B. This will include Close to transfers.
- Check any appropriation account figures and Ledger Bought Forward totals.
When you are happy with all the above, continue processing.
The Accounts Master File contains a record for each account - alterations are immediately
effective. A
Chart of Accounts can be printed for reference.
Normally the balance fields cannot be changed except when your records are being
loaded for the first time - make sure that the
Set Up mode is turned OFF.
N.B. You MUST know your company's code structure before making
any additions and whether the record should be
split to another account
or
closed to an account.
CHANGE:
F6 - to enable changes.
F9 - to save changes;
Enter to accept OR
F6 to make
further changes
OR
Esc to exit without saving changes (even if you have already pressed
F9).
COPY:
F8 Repeat: copies the details of the last record you had on the screen to the
new code you just added.
N.B. if the balance and budget fields
these will also be copied and will need to be cleared. Turn off Set Up, as above.
OR
F5 to Add the new code to a blank record. Key in the details
OR
Enter to Ignore the new code and return to the prompt.
F9 to End Input to save your data.
OR
Esc to return to Account prompt without saving.
DELETE:
N.B. DO NOT delete records with non-zero Balances - these records should not be
deleted but you must get the balances to zero first through postings. Once an account
is deleted it will no longer appear in reports.
F7 - to Delete an account record and
F2
- to confirm. OR
Esc to exit back to account code
prompt without deleting.
UNDELETE:
Enter the code at the prompt.
F4 Undeletes the last deleted record but ONLY if
you have not left the program since deleting the record.
The settings here are predominantly for controlling journal entries made directly to the Ledger,
other settings control integration from Creditors etc.
At the prompt, enter the new Account Code.
- Description: of the account.
- Alpha Code: descriptive code for Alpha Lookups. These
need not be unique; use capitals for consistency. The system can be set
to default to either Alpha or Numeric codes.
- Close To: a valid Account Code to which the balance
of this account will be transferred / closed to at the end of the
financial year with the Yearly Roll.
Usually for posting expense and Revenue accounts to a Profit and Loss Appropriation
account. N.B. You cannot close an account to more than one account; e.g.
if account "230000" is closed to "639000" you may not close "639000" to "700000" as well.
- Change To: used only when re-coding Ledger accounts.
- Reverse Value: to automatically reverse the
value of the amount entered. Use for accounts that normally require
negative postings - e.g. a sales accounts to save using the minus key all the
time. N.B. a positive journal to this account would then need a minus sign.
- Report Codes: up to six 1 or 2 character codes. These
are additional selectors for reports. Each account may be "tagged" with
up to six report codes which can be used as additional selection criteria for
reporting purposes. The report selects only those accounts that carry
at least one of the report codes specified.
When running reports you have the option of selecting by these Codes -
any account which carries the matching Report Code(s) will be included
in the report. This allows grouping of otherwise disparate accounts.

- Quantities: Y
if you post quantities as well as dollar amounts to this account.
- Up to 5 Split To accounts with "Apportionment
Code". Each account may have up to 5 account codes entered here along
with an Apportionment Code which controls how much of an entered value is to be
split to the specified account. In the e.g. a GST account code and the "GST"
Apportionment Code are specified - a posting of $90.00 is multiplied by
a value on the Apportionment Code (e.g. 0.1111): $10.00 is posted to the GST
account and the remaining value is posted to the Sales account.
- Balances: Year Opening and Last Year End may be
entered when the accounts are first loaded.
- Budgets may also be maintenanced separately.
Run eg. 8PLL09M1
B - the
B should be built into the menu for Budget spreads.
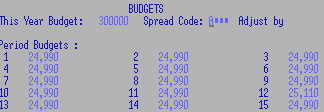
- This Year Budget: key in a value for 12 periods
- Spread Code: key in a Budget spread (there can be several on your system)
and Enter.
Put zero in the Budget field - leave the spread code and Enter to clear and start again.
- Adjust by: not available.
The calculations are worked out as per the spread, these can be changed
as required. Alternatively, the Budget for each period can be entered.
Several reports include Budgets.
F4 and
Enter to accept file name "ccPLT".
F3 or specify Account, Date, and Period and
F3
The "Sequence" is 1 unless more than one entry was made to the same account on the same date.
It is always better to make changes to using
Postings but you could e.g. add text
to an entry. N.B. If you change a value, it will not be added or deleted to the account balance - you would have to
change that as well. Know what you are doing and use with care.

Use this powerful program with care! Back up your files first, and run a Trial Balance for the
periods you are dealing with to check that you have the right result.
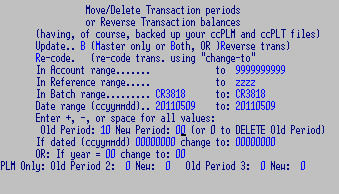
- Update: (Master only or Both to include transaction file, OR Reverse transaction)
- Re-code: Re-code trans. using "change-to"
- In Account range: space to 9999999999 includes all accounts
- In Reference range: space to zzzz includes all references
- In Batch range: CR3818 to: CR3818
- Date range (ccyymmdd).. 20110509 to: 20110509, note the date structure.
- Enter +, -, or space for all values:
- Old Period: 10 New Period: 00 (or 0 to DELETE Old Period)
- If dated (ccyymmdd) 00000000 change to: 00000000
- OR: If year = 00 change to: 00
- PLM Only: Old Period 2: 00 New: 00 Old Period 3: 00 New: 00
See
general information on Toolkits.
Talk to us about these or any other specific requirements.
There are a number of standard and custom designed reports. Because no
account structure has been imposed on the system, most reports will need to be
customised to your individual chart of accounts. See
Report page for examples of reports.
Your menu entries may default to the Format most
often used for this report - Esc and F3 for a different one.
F9 and
Enter to print
OR modify any fields for this run:
- Select Periods: any range between 01 - 24
(or 1 - 60 weeks).
Defaults to the current financial period on settings.
Periods 0 - 0 to print
Opening Balances only.
- Report Date: (prints on report) defaults to today's date.
- Detail Lines per page: Paper length.
- Year: 00 current, 01 last year (history file), etc.
Newly added accounts will not appear in historical reports.
- Left margin: 05 to increase left margin by e.g. 5 characters.
May be 00, 05, 10, 15, 20, or 25.
- Title: can be changed for this run only.
- Sub-headings 1-2: can be changed for this run only.
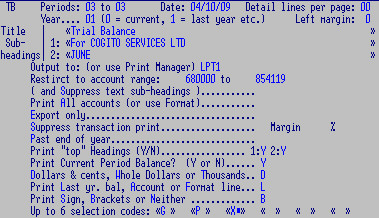
- Output to (or use Print
Manager): e.g. LPT1 or a Print File name P-TB5,
or accept current settings.
- Restrict to Account Range: A keyed in range of
Accounts will override the Format range - could be a single account code.
These fields are right aligned and accept numbers only, leading zeros are ignored.
- (And Suppress sub-headings): if you are restricting the account
range you may also want to suppress Text Records
included in the report format (e.g. "Total Expenditure" etc.)
- Print All accounts (or use Format):
Or space for Format default N.B. this does not override the
Selection Codes (below).
- Export Only: to suppress ALL (title, headers and page breaks) for
spreadsheets etc.
- Suppress transaction print
- Margin 0.01% 8PLP02M4 only, prints all
transactions, this limits to differences over the designated margin.
- Past end of year: to EXCLUDE balances in periods 13 - 24.
- Print Report Heading (Y / N):
1: N to suppress program name, date and time, page No. etc.
2: N to exclude description header e.g. "Trial Balance, Periods 05
to 05" etc.
- Print Current Period Balance?: Y to print the account "movement"
(i.e. transaction totals) for the selected period range, else Closing Balances
only.
- Dollars and Cents, Whole Dollars or Thousands: to
format how values will appear on the report.
- Print Last yr. bal, Account or Format line: the first
column of your report will print respectively: the balance as at the
end of last year - the Account Code - or (some reports only) the record No. of
the Report Format which produced each report line.
- Print Sign, Brackets or Neither: to format how
negative values print.
- Up to 6 Selection Codes: any code(s) applicable to
your system. E.g. if you put P and L here, all accounts which
have either a P OR an L in the report code fields will be
included in the report.
The reports are run with Report Formats which control the headings and other formatting.
They also determine which accounts are included and how they are
totalled so that very specific reports are produced.
There can be any number of formats stored on the Format File, each
identified by a code - also see
Lookup.
Most Formats can be used with most reports and they can be added, changed
or deleted at any time.
They may also be modified when
running reports,
so that only the information you require is printed.
The Formats are made up of a number of Records. Each Format requires at
least a Header record and an Accounts Selection record and usually a Totals record, some Formats
may consist of dozens of records.
When running a report, each record acts on the report program in sequence.
A report of the Format can be printed.
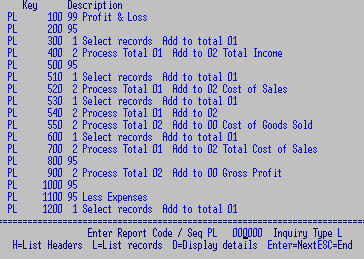
Hit any key to display a list of the report Headers on your file.
Key in a Report Code e.g. "PL" for Profit and Loss and change the Inquiry Type to
Detail or
List.
| 8FRL09M- TO CHANGE, COPY OR DELETE FORMATS | REPORT MAINTENANCE |
To change a record -
F3 or key in the Format Code
F6 to Change - select the report sequence No. (record) to change -
see Adding.
To Copy another Format - key in the new Code and
Enter
F8 and key in the code to copy. All records are copied - they can
then be changed or deleted.
To delete a format
F7 to Delete ALL records of a Format and F2 to Confirm.
| 8FRL09M- ADDING A NEW REPORT | REPORT MAINTENANCE |
Give each report a name (up to 4-characters);
(call Trial Balance, Profit and Loss, and Balance Sheet reports: TBxx, PLxx,
and BSxx, respectively).
Key in the new Format Code and
F5 to Add.
The first record is automatically a Header (Type 99), sequence No. 100.
(The Format is read in numeric Sequence not the order in which you added the records
It doesn't matter what a record number is as long as it is in sequence.
You can insert 99 records between 100 and 200)
Make any changes, F9 and Enter to save.
Enter the next record, number it more than "100" -
F5 to Add
(or F8 to repeat the last Record on screen and make any changes).
Enter the Record Type at the prompt
Continue adding records to the Format and Esc when finished.
Plan how you want the report to appear - how many columns, sub-totals,
totals and grand totals are to be printed.
(4 columns are available in some reports.)
Totals can be printed, accumulated and / or carried forward or added into
other totals.
When planning a report, establish when totals should be cleared, printed or
added to other totals.
There are five Record Types - each has a different function.
Starts a new page and carries the report header and much of the formatting.
Every Format must begin with a 99 record - a 99 can also be used within a
Format to start a new part of a report.
This record contains most of the information you can see and change when
running a report.
- Heading 1: name for this report. Headings 2 and 3 for any additional
description.
- Dollars and Cents, Whole Dollars or Thousands to print
- the last two selections apply rounding.
- Print Last yr. Bal, Account Code or Format line in the
Left-most column.
Most report programs allow either Last Year-End balance or
the Account codes - some also allow the Format Code.
- Print Sign, Brackets or Neither: for how credit
balances are printed.
- Print Report Headings Y / N: For some report presentations (e.g.
Annual Reports) you may wish to omit:
1 - the program line (program name, company name etc.) and / or
2 - the heading line (e.g. "Trial Balance, Periods 05 to 05" etc.)
- Print Current Period Balance Y / N:
Y to print the account "movement" (i.e. transaction totals) for the
selected period range,
N for Closing Balances only.
- Export Only E: to eliminate all headers and page breaks - for
spreadsheets etc.
- Detail lines per page: (paper length) number of lines to print per
page.
- Left Margin: Increase left margin by 5, 10, 15, 20, 25 characters.
- Output to (or use Print Manager): e.g.
LPT1 or P-TB.
- Suppress transaction print: to print a summary of Balance
(applicable to Posting Reports).
- Up to 6 Selection codes: Each account may be
tagged with up to six 1 or 2 character report codes.
N.B. This setting is over ridden if report codes are selected on the
01 Record Types, see below.
This allows otherwise disparate accounts to be grouped together for
reports e.g.
you can run a report for all accounts with a "CH" or "C" to
produce a "Christchurch" report.
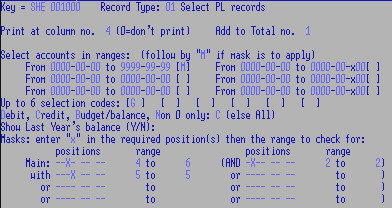
Select accounts for the first total (repeat for each subsequent total).
Only selected totals are printed (unless overridden when the report is run).
- Print at column no.: e.g. 1 to print each account balance and then
the total OR
leave blank to print the total only.
- Add to Total no.: usually 1, which can then be cleared and used
repeatedly.
- Select accounts in ranges: Up to six ranges for selection purposes.
See Masks, below.
- Up to 6 Selection codes can be used to include
/ exclude accounts.
- Print:
Non-0 only - filters out accounts without balances
Default (space) for ALL accounts
Debit only - filters out accounts with Credit balances
Credit only - filters out accounts with Debit balances
Budget / balance - applies to selected reports only.
- Include Last Year's balance: Y or N: Some reports print last
year's balance.
A particular account selection (e.g. Profit/Loss appropriation) can be
excluded.
- Masks: This feature enables you to include / exclude accounts based on the
structure of the selected account ranges.
Enter Mask after any or all the ranges to include ONLY the "groups"
you then specify.
At "Groups, Enter an X to mark the position on the account code then
the number range to include.
You may specify that only accounts with e.g.
2 in position two
4, 5 or 6 in position three
5 in position four are printed
e.g. x245-xx-xx, x255-xx-xx, x265-xx-xx etc.
- Periods' Budgets: Q for quantities else value.
- Cost / Factor: for "what if" reports,
Process the selected total and define the layout.
- Select Total: e.g. process total 1.
- Description to print for this total e.g. Total Income.
- Print at column no. e.g. 1 - 0 to NOT print total 1.
- Add to Total no: e.g. 2; i.e. total 1 now becomes total 2 and can be
used in calculations further down the track.
Leave blank if NOT to added into any other sum.

- Clear Total: having processed Total 1 Y to clear the value it
carries or
N to allow more values to be added into it.
Immediately after running a report, and before leaving the report program,
un-cleared totals are still viable
i.e. it is possible to run a series of reports one after the other, using
the same or different Formats, with carried on totals.
- Factor (0 - 100%): Percentage of total 1 to be included in this calculation
e.g. you may want to apportion 80% of your Electricity costs to a factory
and the other 20% to the office.
Default (space) is 100% OR
enter between 0.01 and 999.99.
- Divide the above factor: else default (space) to multiply.
- Underline above in col. No: e.g. 1 to print a dashed line above this
total.
- Underline below: Y to print an underline below this total.
- New Page after total: Y to force a page break.
- Lines to skip after total: e.g. 3 blank lines after this Total.)
- Show Last Year's balance: Y or N - selected reports only.
- Print Net else default (space) for Debit and Credit values.
- Print if:
Non-0 only - filters out accounts without balances
Default (space) for ALL accounts
Debit only - filters out accounts with Credit balances
Credit only - filters out accounts with Debit balances
Budget / balance - applies to selected reports only.
For comments, section headings or blank lines. Consecutive
text records print on consecutive lines.
Leave blank for a line space. The 3 fields are 132 characters long and fit
right across the columns of a report,
you may need to run the report several times to get the placement right.
- Part 1: for a Heading over column 1 which usually shows Last Year's Balance
or Account codes.
- Text Part 2: for the rest of the columns.
- Sub-heading? (1, 2 or N): If text is to appear on each page (from here on)
then enter the sub-heading line on which it will be printed or
N to have text to appear once only.
Only applicable to some report programs. This function
enables balances to be produced as a percentage of a designated total.
It is mostly used to show individual sales accounts as a percentage of the
total or to show expenses in relationship to sales.
- Ratio Base Total: Which total to base ratios on. 0 = stop printing ratios;
i.e. turns off the option.
- Print Period, Balance or All:
| 8FRL09M- SETTING UP A NEW REPORT | REPORT MAINTENANCE |
Following is an example of how to create a P + L Format for this Chart of
Accounts:
230 000            Sales
240 000 - 240 002  Purchases
270 001 - 285 000  Expense A/cs
298 001            Wages
298 002            PAYE
300 000 - 500 000  Expense A/cs
600 000 - 900 000  Balance Sheet Items


PROFIT AND LOSS REPORT
                           Current Period  Closing Balance


230 000  Sales                   191,867-        191,867-
                               ----------      ----------
         Total Income            191,867-        191,867-
                               ==========      ==========

240 000  Purchases                12,105          12,105
240 001  Purchases                 1,854           1,854
240 002  Purchases                   900             900
                               ----------      ----------
         Cost of Goods Sold       14,860          14,860
                               ==========      ==========

298 001  Wages - Net              56,380          56,380
298 002  Wages - PAYE             16,387          16,387
                              -----------      ---------
         Total Cost of Sales      72,767          72,767
                              ===========      ==========

         Gross Profit            104,240-        104,240-
                              ===========      ==========

         Less Expenses
270 001  Account                  11,344          11,344
270 002  Account                   3,615           3,615
270 003  Account                   1,797           1,797
281 001  Account                   8,005           8,005
300 000  Account                   3,037           3,037
301 001  Account                     595             595
305 000  Account                   1,278           1,278
309 000  Account                     303             303
311 000  Account                     280             280
312 000  Account                     163             163
316 000  Account                   1,295           1,295
368 000  Account                     583             583
369 000  Account                     470             470
371 000  Account                     153             153
...
422 000  Account                     466             466
429 000  Account                   7,521           7,521
456 000  Account                      53              53
460 000  Account                   7,376           7,376
464 000  Account                     318             318
487 000  Account                      11              11
                               ----------      ----------
      Total Expenses              53,834          53,834
                               ==========       ==========

                               ----------      ----------
      Net Profit                  50,405-         50,405-
                               ==========      ==========
To achieve this:
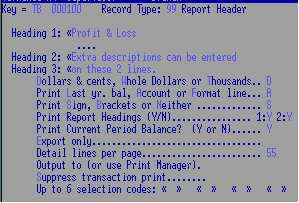
1. Add a new Format code: Record No. 0100 and
Type 99 default for the first record.
Give a title "Profit and Loss" and accept or change format settings.
F9 to save record.
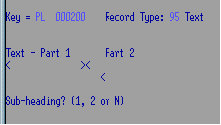
2. Key in Report Seq. e.g. "0200" F5 to Add.
Select Type 95 and leave blank to add a blank line
after the Header.
Save.

3. Key in Report Seq. e.g. "0300" F5 to Add, select
Type 01.
Select to print in column 1, select the Total these accounts
are to be added into, and the range of accounts required.
Select Non zero values only. Save.
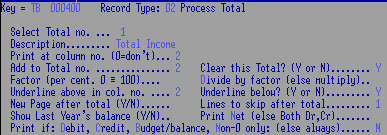
4. Key in Report Seq. e.g. "0400" F5 to Add, select
Type 02.
Select Total 1, add a description "Total Income".
Select to print in column 2, Add to Total 2, and clear Total 1.
Apply formatting. Save.

5. Key in Report Seq. e.g. "0600" and F5 to Add, select
Type 01.
Select Wage Account Range and to add them to Total 1. Save.
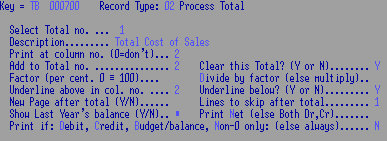
6. Key in Report Seq. e.g. "0700" F5 to Add, select
Type 02.
Process Total 1 with Total 2 and add a description "Total Cost of Sales".
Apply formatting. Save.
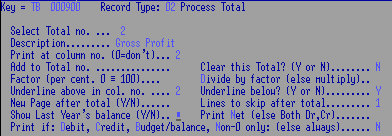
7. Key in Report Seq. e.g. "0900" F5 to Add, select
Type 02.
Process Total 2 add a description "Gross Profit".
Apply formatting. Save.
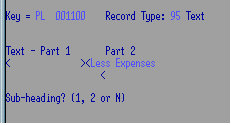
8. Key in Report Seq. e.g. "1100" F5 to Add, select
Type 95.
Process Total 3 with a description "Less Expenses". Save.

9. Key in Report Seq. "1200" and F5 to Add, select
Type 01.
Select Expense Account Ranges and add to Total 1. Save.
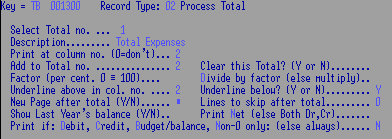
10. Key in Report Seq. e.g. "1300" F5 to Add, select
Type 02.
Process Total 1 with Total 2 and add a description "Total Expenses".
Apply formatting. Save.
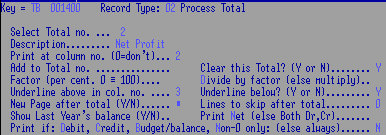
11. Key in Report Seq. e.g. "1400" F5 to Add, select
Type 02.
Process Total 2 with Total 3 add a description "Net Profit".
Apply formatting. Save.
A summary of these records can be viewed via the Report Lookup using Inquiry
Type L.
- Reporting mask: Charts of a/c vary - this e.g. prevents the first 4
characters from printing on reports BBBB111222 for nnn-nnn.
- Monthly or Weekly accounting: available.
- Last reverse-to period: 24 to prevent Reversals to 25 (52 weeks).
- Current period: PL/Creditors, Sales and Costing. Set initially to current
financial period - all updated by PL Roll.
- Current Period Ending: set initial date (as for Sales Periods tables) - updated by PL Roll.
- Repeat previous Trans. Date Y to repeat.
- Repeat previous Trans. Ref. Y to repeat
- SU to allow Set-Up mode: alter Balances
- Y to force Report Category: must enter at least one code.
- Allow auto balancing: If allowed it displays "split-to" when
entering a journal whether a/c has a split-to or not.
- Default to Alpha code: GL ONLY - NOT CR
- Ledger Plucker, Maintenance, Inquiry: enter any non-standard programs
May be various
budget spreads for different types of accounts.
- No. of Periods (12 or 52):
- Default ratio: key in e.g. 8.333 and Enter
for approx. 100% total and to calculate an even spread, else enter spread.
Make a record for each Report ?Code used e.g.
G for GST. NOT PLUCKABLE - NOT VALIDATED
- Code: GST
- Description: GST
- Rate 1: 0.1111 Divide by: 0.00 until period: 17 year: 2010 (12.5%)
- Rate 2: 0.1304 Divide by: 0.00 until period: 99 year: 9999 (15%)
OR 130,434.7826 Divide by: 1,000,000.00 until period: 99 year: 9999 (15%)
E.g. to establish a rate of .1304347826%, (3/23rds off = 15% on) enter as .1304 OR 1,304,347.826 and Divide by 100.00
To split off 1/9th (old GST of 1/8th or 12.5%), enter .1111
Use the "until" period / year to allow for changeover.
NOT AVAILABLE YET.
- Code:
- Description
- Enter the Week No. which ends each reporting Month: e.g. 4 or 5 in the periods.
- SICRPL Description:
- PL Interface Prog: 8SIL22M
- Parameter: CRI= (CRI=)
- PL Processing Prog: e.g. 8PLL01M4
- PL company code: (only if NOT the same as the CR company code)
- Accounts Payable A/c: e.g. 870000
- GST Account: e.g. 911000
- Bank Account: e.g. 680000
NOT AVAILABLE YET
- SIINPL Description:
- PL Processing Prog:
- Last PL batch No:
- auto-Update to PL:
- Stop or Warn on error.
- Sales A/c: e.g.
- Cost of Sales Account: e.g.
- Stock: e.g.
- Post to Creditors: (default is 8CRL01M5)
- Stock Account: e.g. 270001
- "Addons" account: e.g. 368000
See Branch Controls for individual Branch accounts
- SIDTPL Description:
- PL Processing Prog: e.g. 8PLL01M4
- Last PL batch No: 67
- auto-Update to PL: x
- Stop or Warn on error. x
- Debtors Control A/c 645000
GST Account 912000
Bank Account 680000
For each account enter a PL code, a Builder code, a Control code
or none of these if the account is carried on the source data.
e.g. Builder Code (see
PL set-ups)
is the key of a PL Code-Builder plan
Postings will be "Grouped" per PL account unless "Detail" chosen
Postings will be calculated per "Document" unless "Line" is selected
Enter through this record to enable.
Description: Cashbook
Cashbook: CBRC
- Full implementation: F (else partial with old PL integration) (8CBX06PU space to "P" and '*')
- Un-presented payments: 250.00-
- Un-lodged deposits: 100.00-
- Last un-presented key:
- Last un-lodged key:
- Last Run no.: Last banking No.
- "Current Position" report: 8CBL01 (Default 8CBP10)
- "Unpresented" report: 8CBP02C3 (Default 8CBP0C3)
Creditors: CBRC03
- Direct Credit Schedule: 8CBP02D1 (Default 8CBP02D1)
- P/ledger update program: (Default 8CBL04M)
- Last processed key
Debtors Banking CBRC01
- Payments program: No. 2 (Default 8DTL01C2)
- Full Payments Register No. 3 (Default 8CBP02P1)
- Banking report: Banking Schedule in No. 4 (Default 8CBP02P2)
- Banking Log: (Default none)
- P/ledger update program: (Default 8CBL04M)
- Individual payments: (to CBM, else accumulate per run)
- Last processed key:
- Current Banking Date: and Sequence: i.e. next Run No. to be assigned Last banking No.
Cash Sales: CBRC02
Future
- Cash Sales Register Prog: 8CBP02P1 (Default 8CBP01C2)
- Register Report ID: e.g. P-CASH (Default P-CBL03)


